Sunday, February 19, 2017

On to the next holiday!

I may have mentioned that as a classroom teacher, my room decor seemed to revolve around the holidays.  Even though I was a high school teacher, the students enjoyed the decorations as much as an elementary student.  I do have a few projects that I am currently working on but I thought I would give you a sneak peek at my next lesson for you.


My grandson is a "wee bit Irish" so you can probably guess where this project is going.

Here are the highlights of this lesson:
>Clover Artwork from Hope Yoder Library
>Copy and Paste using the new feature from this weeks new update 3224
>Resizing and Editing the Artwork
>Remove Overlapped Artwork

I plan on adding a monogram but we'll see...


Tuesday, February 14, 2017

Happy Valentine' Day

Free today from Miss Kate Cuttables here


CNC New Update!!

Happy Valentine's Day.  Today Floriani software launches all of their free latest updates and I was excited to see that the Craft N Cut was also included.  What a fabulous company to be able to update all of my software without any cost to me. 

Open your software and go to the Help drop down on the Tool Bar.  Look for >Check for Updates.

This will bring you to the update page within the RNK site.  Follow the prompts to update your software.


Since I just updated my software this morning, I am still learning about the new features myself.  So the first step is to find the videos located in the opening screen. I was slightly confused because some of the videos said Build 3217 but the actual Build is 3224.  Perhaps it is just me, or not.


They are 6 of them and they are listed at the top and start with CNC.  If you can't find them here is the link to the software videos by Hope Yoder.

It looks like a busy day for me trying to catch up on all of my updates.


Monday, February 13, 2017

L-O-V-E pillow is finished, finally!

My goal yesterday was to finish my LOVE pillow.   This project was the January project for the Floriani FTC-U software.  I combined both the FTC-U software and the Craft N Cut software plus a bit of my own flair.


The 'how-to-create' the heart in the upper right was posted earlier and you can check it out here.


The "L" and "E" are vinyl cuts- EZPZ and the V is the file included with the lesson.  A added a few Hot Fix crystals to the "V" to bling it up.  The button in the center doesn't show up very well but it is design to give the pillow a tufted look.

Yesh!  Finished and on the sofa before Valentine's Day!


Saturday, February 11, 2017

Valentine Vinyl projects

I am finishing up my Valentine projects this weekend and I wanted to share with you a few of my Dollar Tree bargains.  I purchased these stuffed lady bugs for my grandchildren in Atlanta.  I added their names and date in vinyl and it was very easy to do.  


When I size items for lettering, I usually create a pre-sized shape so I know that it will fit perfectly.  In this case, the rectangle is 2.5" x .6" and the names and dates were sized to fit the box.


Even though it may not appear as if the lettering fits in the rectangle, they actually do fit.  I made sure to MIRROR the image horizontally and then >SAVE2CUT and saved them in the Silhouette format.


In this software, you must be sure to select the CUT option and the Heat Transfer vinyl options and set the blade according to the directions in the SAVE2CUT print out.  Be sure to do a test cut to make sure that the machine cuts the vinyl with a "kiss cut".


These were so quick and easy and I am glad that I went to the Dollar Store right after Christmas because there was not ONE in the store today! Their box was shipped today and should arrive on Monday!  

I hope your grandkids/kids have a wonderful Valentine's Day!!!


Thursday, February 9, 2017

Machine Applique or Vinyl...you choose

Last Year I purchased A Kimberbell Valentine, Vol 1  but I never had enough time to make anything.  So this year I pulled it out again and I am trying to decide whether I want to do machine appliqué or heat transfer vinyl.  That is the best part with the Craft N Cut software, I can do either one! This CD is from 2014 and was not including SVG files at the time, but I can now create a SAVE2CUT format and create one!

Open a >NEW file and then>OPEN and find your machine design where you have saved it.  In my case, the CD was in my D drive and I selected the 5 x 7 cupcake design.  Be sure to select >CONVERT TO CURVES or you will not be able to convert it to ARTWORK.


Hold down the Control key and select the Indian Ocean color - these are the three placement lines for the liner, frosting and heart. Then>COPY and >PASTE in a >NEW file.


Select All or Crtl + A and then select >ARTWORK.

I prefer to separate the designs and re-color them to match my preferred color. Then Select>SAVE2CUT.  Don't forget to save it as a WAF file as well.  If you are going to use Heat Transfer Vinyl be sure to MIRROR the image before you SAVE2CUT!

Then open up the SAVE2CUT files in your machine's software and cut out the designs.  I like to save both in one file and then just drag one off the mat when cutting out the shapes. 


I hope I have inspired you to give it a try!  I need to go shopping before I can cut this out.  First store - Adeline's Closet!


Wednesday, February 8, 2017

It's all about the bling!

I have been using rhinestones for many of my crafting projects for at least 5 years now. Not only do they add sparkle to your project, they can also cover up mistakes!

The Craft N Cut software makes it so easy to add rhinestones, I was amazed! This is a design from the Hope Yoder library and with one click you can add a border of rhinestones.


This is the same bone but the graduation hat is from the artwork folder. I added the name and date to be cut from vinyl as a second step. (I will mirror image them in the Silhouette Cameo software 😁)


It was that easy to create my rhinestone heart.  I spaced them further apart because I knew it would be easier to place them onto the fabric.


I did not have any Sticky Flock but another product called Crystal Template material. I placed it paper side down on my mat and used the rhinestone material cut. With this product, I peel it off slowly and then place it on a Styrofoam board for support.


I have purchased a small tray from Michaels (used for embossing) and a small foam brush from Lowes.  I used 10ss Hot Fix crystals and poured them onto the template material.


 I then used template plastic to pick them up and line them up onto my heart.  I pressed them with a hot dry iron and then let them cool.

I would recommend that you watch Hope's Application video for Rhinestones as it is very thorough and detailed.  She uses Sticky Flock and I have yet to purchase this product.

Here is a chart to help you determine what size rhinestones to purchase based on the software's options.  Make sure they are Hot Fix or you cannot iron them on to the fabric.


Here is my heart with the rhinestones .  Tomorrow's lesson will be working with Heat Transfer Vinyl.


Tuesday, February 7, 2017

I love Miss Kate!

I have been a big fan of Miss Kate for several years now.  She offers a FREE SVG file every day. Recently she has been offering free designs while they are available.  Here are a few.


                    Free Heart with Arrow


                            Free Heart Tree


                         Free I Love You title

Come back in a few days and I will show you how to use these designs with your Craft N Cut software!


Valentine's Day Sewing Projects

In keeping up with my theme this month, I had to share this inspirational link!
Valentine's Day Projects  How cute is this pillow?  Just one of the several shared projects.


Machine Applique with Craft N Cut!

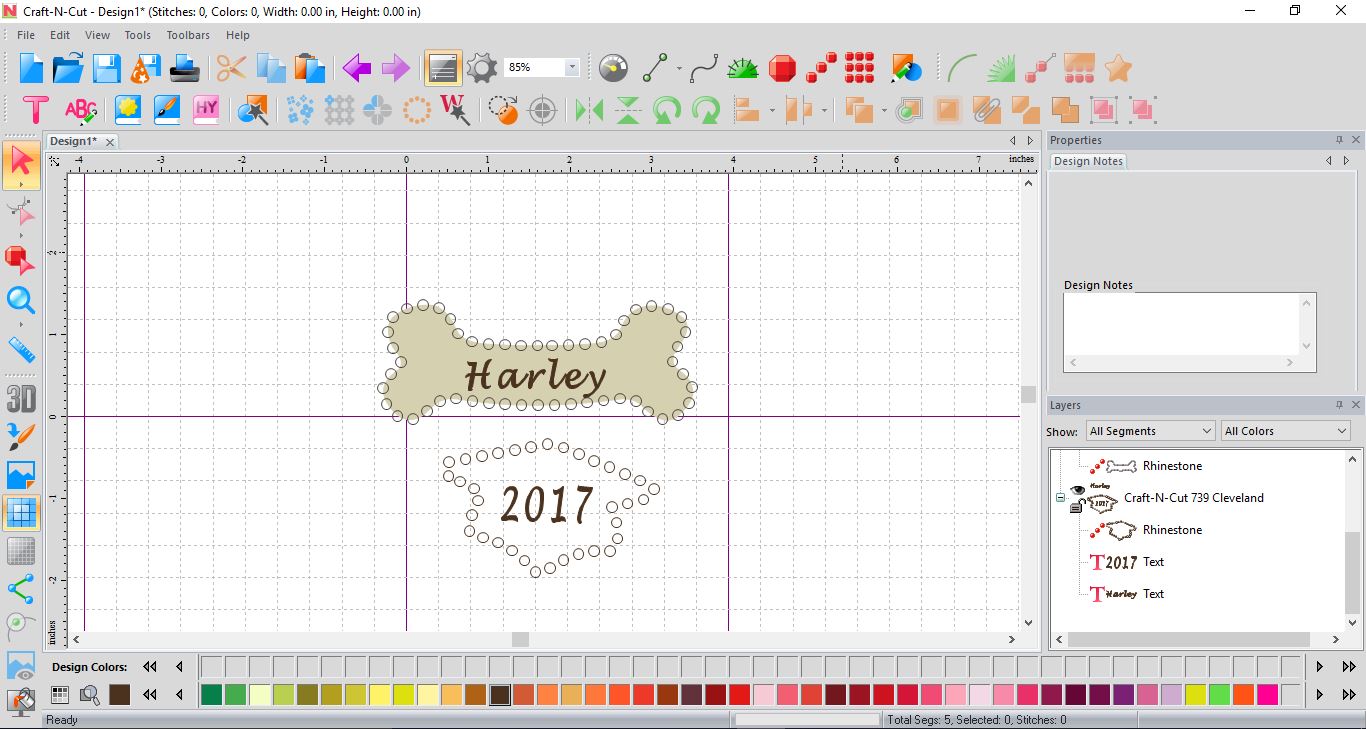
Today's lesson is how to cut out the heart appliqués using the Silhouette Cameo 2.  Once I have saved my design in SAVE2CUT,  I then create a folder for the files.  When you use the SAVE2CUT feature, they are all converted to your machine's file format.   For me, they are SVG files but I have another software called the InVue and that is why you see them with that symbol.  If you have a Brother Scan N Cut or any other machine, be sure to select that machine from the drop down menu.


I then highlight and drag the files onto my Silhouette software screen. I use the split screen effect on my computers so I can see what I am doing.


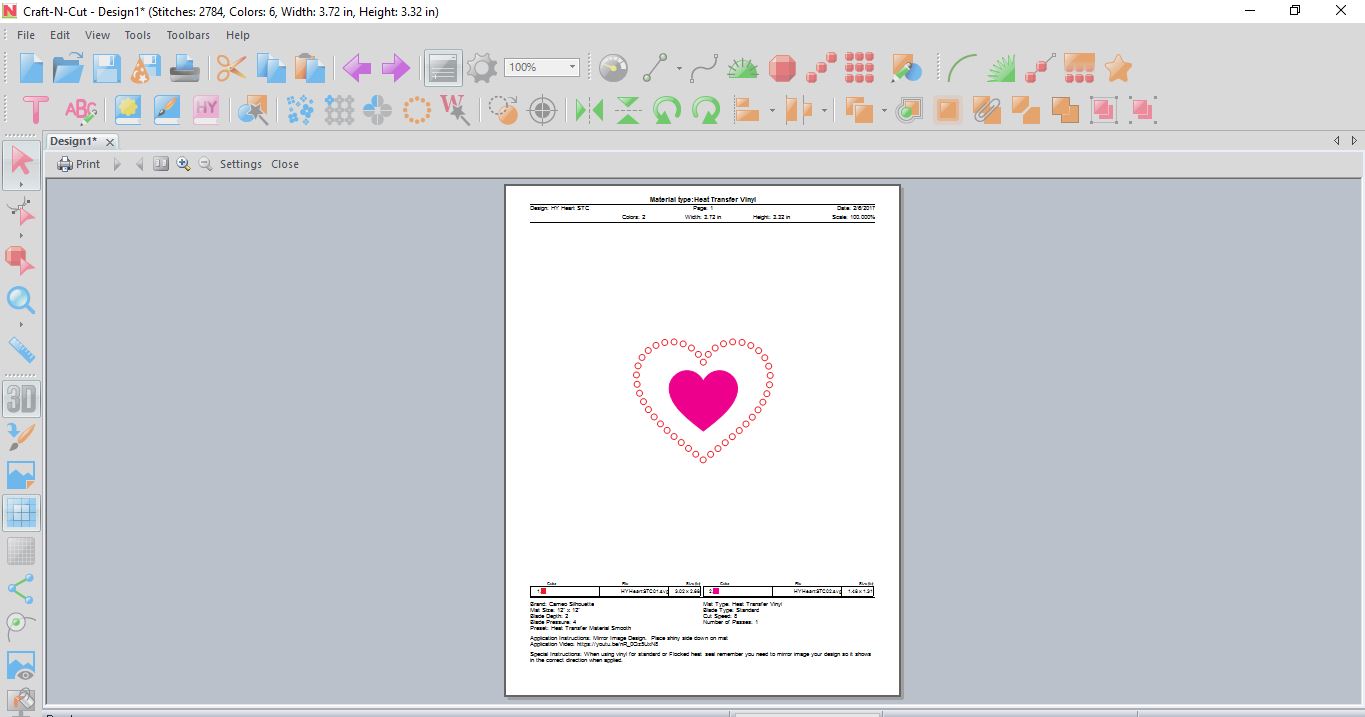
I separate the files according to their cut features. I drag the files I am not using off the mat.   First the fabric appliqués.


When I prepare my fabric, I cut the fabric slightly larger than the  actual size as the fabric does shrink after spraying.  I then spray the fabric with Terial Magic. Let dry and then iron them. The last step is to iron Appli-Kay Wonder to the back. (I love this stabilizer by Floriani!)  I then cut the fabric to the actual size for my mat.  The large heart is a 4" square and the small heart is a 3" square.


Be sure to do a test cut and for this cut, I cut it 3 times ( a function of my Silhouette software) to get a nice crisp cut.


Next I head over to my machine and load my design onto the screen.  I always float my fabric to the stabilizer and so I always add a basting box to the design.


The first color is the placement line, and you see the heart fits perfectly.  The second stitch out is the tack down and the third is the satin stitch.  


In designing this pillow, I divided my 14" square into 4 sections.  I then found the center of each section.  I backed my white fabric with a woven fusible stabilizer to prevent bleed through.  This heart will be in the upper right corner of my pillow.

Tomorrow's lesson is Rhinestones.  Since I am a bling kind of girl, I love to add rhinestones to my projects!  See you then!


Monday, February 6, 2017

My final Heart design

I am pretty pleased with the way this turned out....

Satin stitch appliqué, vinyl HTV and rhinestones - oh yeah!!!

264 Free Designs by Hope Yoder

Congratulations in successfully loading the software onto your computer!  The next step is to load the 264 free designs into the software because we will be using one of her heart designs for my pillow project.

Watch this video for the step-by-step process.


    Select the heart shape from the Hope Yoder Library


I did not change the size of the design.  Use the TRANSFORM screen to change the size of your heart, if you want to make it larger or smaller.


The next step is to change both the black and purple heart to an appliqué shape.  I changed the satin stitch width to 3.5"


I also changed the thread colors to match my fabric choices.

I changed the red heart to a rhinestone design and left the inner pink heart for a heat transfer vinyl application.  It is easy to change the artwork shape to a rhinestone shape with just one click!  I have hot fix crystals in 10ss, so I left it at that size but I enlarged the spacing to 1.75 for a better cut.


The last step was to save the files to Save to Cut, WAF format and my machine's format.


Why not give this lesson a try? Tomorrow I will show you how I cut out the heart shapes using my Silhouette Cameo and how they stitched out.